Download File ➡ https://tinurll.com/2uS1dP
How to Download and Use Kali Linux Live
Kali Linux is a popular distribution for penetration testing, ethical hacking, and digital forensics. It comes with hundreds of tools for various security tasks, such as network analysis, web application testing, malware analysis, password cracking, and more. But what if you don’t want to install Kali Linux on your hard drive or run it in a virtual machine? What if you want to have a portable and flexible way to use Kali Linux on any computer without affecting the host system?
That’s where Kali Linux Live comes in. Kali Linux Live is a bootable version of Kali Linux that you can run from a USB drive. It allows you to have access to a full Kali Linux system without making any changes to the host system’s hard drive or installed OS. You can also configure it to have persistent storage, so that the data you collect and the settings you change are saved across reboots.
In this article, we will show you how to download and use Kali Linux Live. We will cover the following topics:
- What is Kali Linux Live and why use it?
- How to download Kali Linux Live
- How to use Kali Linux Live
What is Kali Linux Live and Why Use It?
Kali Linux Live is a feature of Kali Linux that allows you to run it «live» from a USB drive. This means that you can boot up Kali Linux from the USB drive on any computer that supports booting from USB, without installing anything on the hard drive or affecting the existing OS. You can also remove the USB drive and restart the system to go back to normal operations.
Kali Linux Live Features
Kali Linux Live has several features that make it a convenient and powerful way to use Kali Linux. Some of these features are:
- It’s non-destructive — it makes no changes to the host system’s hard drive or installed OS, and to go back to normal operations, you simply remove the «Kali Live» USB drive and restart the system.
- It’s portable — you can carry Kali Linux in your pocket and have it running in minutes on an available system.
- It’s customizable — you can roll your own custom Kali Linux ISO image and put it onto a USB drive using the same procedures.
- It’s potentially persistent — with a bit of extra effort, you can configure your Kali Linux «live» USB drive to have persistent storage, so that the data you collect and the settings you change are saved across reboots.
Kali Linux Live Benefits
Kali Linux Live has several benefits that make it a useful tool for security professionals and enthusiasts. Some of these benefits are:
- It’s flexible — you can use Kali Linux on any computer that supports booting from USB, without worrying about compatibility issues or hardware requirements.
- It’s discreet — you can use Kali Linux without leaving any traces on the host system or arousing suspicion from anyone who might see your screen.
- It’s fast — you can boot up Kali Linux in seconds and start using its tools right away, without waiting for installation or updates.
- It’s safe — you can use Kali Linux without risking any damage or infection to your host system or your personal files.
How to Download Kali Linux Live
In order to use Kali Linux Live, you need to download the right image file and copy it to a USB drive. Here are the steps you need to follow:
Choose the Right Kali Linux Image
Kali Linux offers several image files for different purposes and platforms. You can find them on the official Kali Linux website. For Kali Linux Live, you need to choose the image file that matches your system architecture (32-bit or 64-bit) and your preferred desktop environment (KDE, GNOME, XFCE, etc.). You can also choose between the standard image, which includes all the tools and packages, or the light image, which includes only the essential ones.
For example, if you have a 64-bit system and you want to use the GNOME desktop environment with all the tools, you can download the file named kali-linux-2023.2-live-amd64.iso. If you have a 32-bit system and you want to use the XFCE desktop environment with only the essential tools, you can download the file named kali-linux-light-2023.2-live-i386.iso.
Verify the Integrity of the Image
Before you copy the image file to your USB drive, you should verify its integrity to make sure it is not corrupted or tampered with. You can do this by checking its SHA256 checksum and comparing it with the one provided on the Kali Linux website. You can use various tools to calculate the checksum of a file, such as sha256sum on Linux or CertUtil on Windows.
For example, if you downloaded the file named kali-linux-2023.2-live-amd64.iso, you can run the following command on Linux to get its checksum:
sha256sum kali-linux-2023.2-live-amd64.iso
The output should look something like this:
0a7c8f9a5b9f7c4a4f6e0a6c8c9b5e0f6d8c7e0a7c8f9a5b9f7c4a4f6e0a6c8c kali-linux-2023.2-live-amd64.iso
You can then compare this checksum with the one provided on the Kali Linux website and make sure they match. If they don’t match, you should download the file again or use a different source.
Use a USB Formatting Tool
Once you have verified the integrity of the image file, you need to copy it to your USB drive using a USB formatting tool. You can’t just copy and paste the file to your USB drive, as it won’t be bootable. You need to use a tool that can write the image file to your USB drive in a way that makes it bootable and compatible with Kali Linux Live.
There are many tools that can do this, such as Rufus on Windows or dd on Linux. You can find instructions on how to use these tools on the Kali Linux website. You should also make sure that your USB drive has enough space to hold the image file (at least 4 GB) and that it is formatted as FAT32.
For example, if you are using Rufus on Windows and you have downloaded the file named kali-linux-2023.2-live-amd64.iso, you can follow these steps:
- Insert your USB drive into your computer and launch Rufus.
- Select your USB drive from the Device dropdown menu.
- Select Disk or ISO image from the Boot selection menu and click on SELECT.
- Browse to the location of your image file and select it.
- Make sure that Partition scheme is set to MBR and Target system is set to BIOS or UEFI.
- Click on START and wait for Rufus to write the image file to your USB drive.
How to Use Kali Linux Live
After you have copied the image file to your USB drive, you are ready to use Kali Linux Live. Here are the steps you need to follow:
Boot from the USB Drive
To boot from your USB drive, you need to change the boot order of your computer’s BIOS or UEFI settings. This will vary depending on your computer model and manufacturer, but usually involves pressing a key such as F2, F10, F12, or ESC during startup. You should look for a message that says something like «Press X to enter setup» or «Press X for boot menu» and follow it.
Once you enter the BIOS or UEFI settings, look for a section that allows you to change the boot order or priority. You should move your USB drive to the top of the list, so that it is recognized as the first bootable device. Save the changes and exit the BIOS or UEFI settings.
Alternatively, you can use a one-time boot menu that allows you to choose the boot device without changing the BIOS or UEFI settings. This will also vary depending on your computer model and manufacturer, but usually involves pressing a key such as F9, F10, F11, or F12 during startup. You should look for a message that says something like «Press X for boot menu» and follow it.
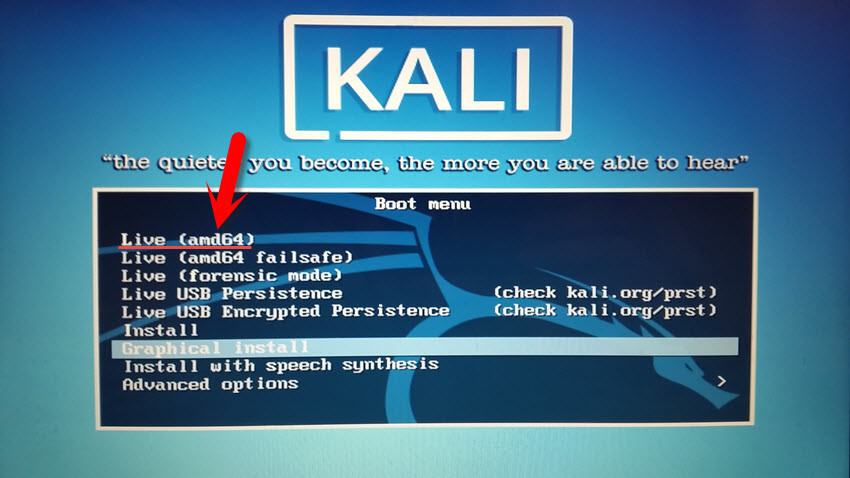
Once you enter the boot menu, look for your USB drive and select it. You should see a screen that says «Kali GNU/Linux Live» and gives you some options to choose from.
Choose the Boot Option
When you see the screen that says «Kali GNU/Linux Live», you have four options to choose from:
- Live system — this will boot Kali Linux Live in normal mode, with the default settings and tools.
- Live system (failsafe) — this will boot Kali Linux Live in failsafe mode, with minimal settings and tools, in case of any problems with the normal mode.
- Live system persistence — this will boot Kali Linux Live with persistence enabled, meaning that any changes you make to the system or data you collect will be saved to your USB drive across reboots.
- Live system persistence (encrypted) — this will boot Kali Linux Live with persistence enabled and encrypted, meaning that any changes you make to the system or data you collect will be saved to your USB drive across reboots and protected by a passphrase.
You can use the arrow keys to navigate between the options and press Enter to select one. For most purposes, we recommend using the Live system option, unless you have configured persistence or need failsafe mode.
Set Up Persistence (Optional)
If you want to use Kali Linux Live with persistence, meaning that any changes you make to the system or data you collect will be saved to your USB drive across reboots, you need to set up persistence before you boot from your USB drive. This requires some extra steps and a separate partition on your USB drive. You can find detailed instructions on how to set up persistence on the Kali Linux website.
If you have already set up persistence on your USB drive, you can simply choose the Live system persistence or Live system persistence (encrypted) option when you see the screen that says «Kali GNU/Linux Live». You will be asked to enter your passphrase if you have chosen the encrypted option.
Conclusion
Kali Linux Live is a powerful and convenient way to use Kali Linux on any computer without installing anything on the hard drive or affecting the existing OS. It allows you to have access to a full Kali Linux system without making any changes to the host system’s hard drive or installed OS. You can also configure it to have persistent storage, so that the data you collect and the settings you change are saved across reboots.
In this article, we have shown you how to download and use Kali Linux Live. We have covered the following topics:
- What is Kali Linux Live and why use it?
- How to download Kali Linux Live
- How to use Kali Linux Live
We hope you have found this article helpful and informative. If you have any questions or feedback, please feel free to leave a comment below.
FAQs
Q: What are the minimum requirements for using Kali Linux Live?
A: The minimum requirements for using Kali Linux Live are:
- A computer that supports booting from USB
- A USB drive with at least 4 GB of space
- A Kali Linux image file that matches your system architecture and preferred desktop environment
- A USB formatting tool that can write the image file to your USB drive in a bootable way
Q: How can I update Kali Linux Live?
A: You can update Kali Linux Live by running the following commands in a terminal:
sudo apt updatesudo apt upgradesudo apt dist-upgradeNote that these commands will only update the current session of Kali Linux Live, and any changes will be lost when you reboot. If you want to keep the updates across reboots, you need to use persistence.
Q: How can I install additional tools or packages on Kali Linux Live?
A: You can install additional tools or packages on Kali Linux Live by using the apt package manager. For example, if you want to install the nmap tool, you can run the following command in a terminal:
sudo apt install nmapNote that this will only install the tool or package for the current session of Kali Linux Live, and it will be removed when you reboot. If you want to keep the tool or package across reboots, you need to use persistence.
Q: How can I access the files on my host system from Kali Linux Live?
A: You can access the files on your host system from Kali Linux Live by mounting the partitions of your hard drive. You can use the Disks utility or the mount command to do this. For example, if you want to mount the partition /dev/sda1, you can run the following command in a terminal:
sudo mount /dev/sda1 /mntThis will mount the partition /dev/sda1 to the directory /mnt, where you can access its files. You can also use the umount command to unmount the partition when you are done.
Q: How can I create a custom Kali Linux Live image?
A: You can create a custom Kali Linux Live image by using the live-build tool. This tool allows you to customize various aspects of your Kali Linux Live image, such as the desktop environment, the tools and packages, the wallpaper, the boot menu, and more. You can find detailed instructions on how to use live-build on the Kali Linux website.
bc1a9a207d